Postulețul ăsta este despre noul meu hobby - făcutul de pâine... și nu orice fel de pâine - pâne cu maia (a.k.a. sourdough bread).
De ce? Recent am mâncat ”de la cineva” pâine cu maia. Mi-a plăcut într-atât de mult încât am decis să fac și eu o astfel de pâine (nota redacției: până acum nu am mai făcut pâine de nici un fel sau orice alt fel de produs care implică aluat - deci dacă eu am putut oricine poate).
Pâinea cu maia e regina - odată ce ai încercat-o, nici o altă pâine nu o să mai fie la fel (tradiționala franzeluță delicioasă cea de toate zilele nu o să mai aibă același gust).
Postarea asta e pentru toți cei care au avut un astfel de moment.
Este despre cum oricine poate să-și facă propria pâine acasă, cu ceva efort (mai mult decât a coborî scările să-ți cumperi franzela cea de toate zilele de la buticu' de la parter).
E o metodă simplă - adică pas cu pas și cu ce înseamnă fiecare pas.Adicătelea, nu tre' să fii brutar profesionist să faci pâine beton.
Ce este aceea pâine cu maia?
În termeni simpli de nebrutar, pâinea cu maia este pâinea fără drojdie sau mai precis pâinea făcută cu drojdie naturală = maia.
Gustul pâinii cu maia e foarte diferit - un gust plăcut acrișor, din cauza acizilor lactici care se formează în fermentarea naturală.
Urmează în curând un post despre cum să-ți faci propria maia, dar asta într-un episod viitor. Articolul ăsta presupune că aveți deja maiaua gata făcută (maia cu hidratare 100%) - dacă nu o aveți o puteți cumpăra.
Metoda mea
Trebuie precizat de la început că pâinea cu maia este mult mai dificil de făcut decât pâinea fără maia, dar rezultatul merită tot efortul, sau cel puțin merită pentru mine.
Cea mai bună resursă, pe care am găsit-o legată de acest subiect a fost blogul Codru de Paine", care explică foarte bine pașii, dar eu voi încerca să sistematizez acest pași și de asemenea să clarific implicațiile și principiile din spatele fiecărui pas (și eventual cum poți să te joci cu fiecare pas dacă nu-ți ies).
Am mai căutat online, dar blogul de mai sus este cea mai bună resursă pentru că e pentru brutarii mai entry-level, adică evită termeni complicați și ingrediente complicate.
Adică dacă citiți postul ăsta o să faceți cea mai beton pâine cu maia pe care puteți să o faceți cu ingrediente de la supermarket.
De ce aveți nevoie:
- maia cu hidratare 100% - 90 grame
- apă de izvor - de 2 ori greutatea maialei - 180 grame
- făină de grâu albă obișnuită (tip 000 sau de preferat tip 650) - de 3 ori greutatea maialei - 270 grame
- sare
- spatulă (de preferat de silicon)
- cântar de bucătărie - foarte important pentru că fără cântar se dozează bine ingredientele, și fără să le dozezi bine, nu iese pâinea
- banneton - pentru dospire (oval sau lung)
- piatră de cuptor sau tigaie/tavă de fontă
- ulei vegetal
- hrănire maiua - 8 ore
- autoliză (mai jos e descris ce înseamnă mai exact autoliză) - 1 oră
- frământare cu adăugarea sării - 30-40 minute
- prima dospire - 2 1/2 ore (custretch & fold la fiecare de 50 minute)
- formarea aluatului - 5 minutes
- a dous dospire la frigider - 8-10 ore
- coacerea pâinii - 40 minute
1. Hrănirea maialei
Pentru hrănirea maialei, eu folosesc mereu 90 de grame de maia (merge și altă cantitate cu păstrarea proporțiilor de greutate).
- 90 grame (sau aceeași greutate ca maiaua) de apă - după care se amestecă până este perfect omogenizată
- 90 grame (sau aceeași greutate ca maiaua) de făină 000 - și se amestecă foarte bine din nou. Merge folosită și o parte din făină de secară pentru cel mult jumătate pentru a avea o fermentație mai bunp.
Cu un marker marcați pe vas nivelul aluatului.
În 8 ore, dacă maiaua este suficient de puternică are trebui să se dubleze sau chiar să se tripleze aluatul.
În 8 ore, dacă maiaua este suficient de puternică are trebui să se dubleze sau chiar să se tripleze aluatul.
 |
| This is how the freshly fed starter will look like |
2. Autoliza
Faza asta din proces are ca scop dezvoltarea glutenului. Glutenul îi dă acestei pâini textura minunată.Se amestecă într-un recipient ingredientele:
- maia (de la pasul precedent) - 90 grame (restul se hrănește încă o dată și se pune restul la păstrat în frigider - maxim o săptămână)
- apă plată (NICIODATĂ APĂ DE LA ROBINET) - de 2(două) ori greutatea maialei - 180 grame
- făină de grâun (000 sau 65) - de 3(trei) ori greutatea maialei - 270 grame
- NU SE ADAUGĂ SARE LA ACEST PAS
Se amestecă (NU SE FRĂMÂNTĂ LA ACEST PAS) ingredientele până sunt amestecate omogen.
Dacă mixtura este prea lipicioasă, adăugați câte o linguriță de făină și amestecați din nou până nu mai este lipicioasă, dar atenție dacă exagerați cu făina altfel pâinea va deveni prea densă.
Dacă mixtura este prea lipicioasă, adăugați câte o linguriță de făină și amestecați din nou până nu mai este lipicioasă, dar atenție dacă exagerați cu făina altfel pâinea va deveni prea densă.
Formați aluatul într-o bilă.
Lăsați la temperatura camerei timp de o oră. Unele resurse online spun ca merge și 30-40 de minute, dar cred că o oră este ideal.
Glutenul face ca alutul să fie mai elastic și mai manevrabil pentru următorii pași ai procesului.
Dacă glutenul este bine format, aluatul va fi puțin lipicios (foarte puțin lipicios).
- la 40 minute - aluatul va fi mai elastic și bulele de aer (din produsul final vor fi mai mari)
- la o oră - glutenul se activează mai bine și bulele de aer vor fi mai multe, dar mai mici
Glutenul face ca alutul să fie mai elastic și mai manevrabil pentru următorii pași ai procesului.
Dacă glutenul este bine format, aluatul va fi puțin lipicios (foarte puțin lipicios).
 |
| Aluatul cu maia înainte de autoliză |
3. Frământarea aluatului
Împrăștiați puțină făină pe suprafața ce se va folosi pentru frământat.
Dați cu apă (sau ulei de orice fel) pe mâini și pe spatulă.
Adăugați sarea (cam o 1/2 de linguriță pentru cantitățile de mai sus) peste bila de aluat și apoi ...
... începeți să frământați:
SFAT: Am încercat frământarea cu un mixer electric și cu un robot de bucătărie și nu mi-a plăcut rezultatul, deci nu recomand.
Dați cu apă (sau ulei de orice fel) pe mâini și pe spatulă.
Adăugați sarea (cam o 1/2 de linguriță pentru cantitățile de mai sus) peste bila de aluat și apoi ...
... începeți să frământați:
- apăsați cu palma și împingeți aluatul, apoi cu degetele adunați-l înapoi (de multe multe ori - cam 5-10 minute de preferat)
- din când în când cu spatula de aluat curățați suprafața de frământare
- după o repriză de 5-10 minute de frământare lăsați aluatul să se odihnească 5 minute
- repetați frământat + pauză de 2-3 ori până când aluatul este foarte elastic și nu se mai lipește deloc de blat
- formați aluatul într-o bilă
Videoclipul de mai jos (de pe canalul YouTube channel al Hobbs House Bakery din Bristol, UK) arată technica în mai mare detaliu.
SFAT: Am încercat frământarea cu un mixer electric și cu un robot de bucătărie și nu mi-a plăcut rezultatul, deci nu recomand.
4. Prima dospire
Puneți bila de aluat într-un bol uns cu ulei.
La fiecare 50 de minute faceți un stretch-and-fold (mai jos pașii):
La fiecare 50 de minute faceți un stretch-and-fold (mai jos pașii):
- luați aluatul și puneți-l pe blatul uns cu puțin ulei în prealabil
- tapați-l într-un dreptunghi
- împăturiți în trei (părțile exterioare peste partea din mijloc)
- repetați pe verticală
O imagine face cât o mie de cuvinte, deci mai bine vedeți videoclipul de mai jos:
5. Dați o formă aluatului
La această etapă aveți 2 opțiuni pentru alegerea formei pâinii (mai multe practic, dar astea sunt cele mai ușoare de făcut și ca urmare cele mai populare):
Banneton = coș, de obicei din nuiele, în care se pune aluatul la dospit
- franzelă sau batard (pentru care se va folosi un banneton dreptunghiular) - care este și favorita mea
- rotundă (pentru care se va folosi un banneton rotund sau un bol mai adânc)
Banneton = coș, de obicei din nuiele, în care se pune aluatul la dospit
Formarea într-o formă de franzelă e puțin tricky, dar nu neapărat grea.
După regula o imagine = o mie de cuvinte vedeți filmulețul de mai jos (sursa canalul de YouTube al Hobbs House Bakery din Bristol, UK)
După regula o imagine = o mie de cuvinte vedeți filmulețul de mai jos (sursa canalul de YouTube al Hobbs House Bakery din Bristol, UK)
- Stretch and fold o dată, pentru a forma o bilă de aluat
- Întindeți aluatul într-un dreptunghi și pliați-l ca în clipul de mai jos
- Împrăștiați făină multă in banneton pentru ca să nu se lipească aluatul de el
- Puneți aluatul format în banneton cu fața în sus
6. A doua dospire
Puneți aluatul în forma dorită în banneton (sau recipientul de dospire) și banetonnul în frigider.
Lăsați 8-10 ore.
Lăsați 8-10 ore.
Scopul acestui pas este acela de a lăsa aluatul să fermenteze încet. Este un pas esențial pentru formarea bulelor din aluat și pentru formarea gustului caracteristic de pâine cu maia.
Ar trebui ca la sfârțitul celor 8-10 ore după ce apăsați pe aluat să fie elastic și să revină la loc.
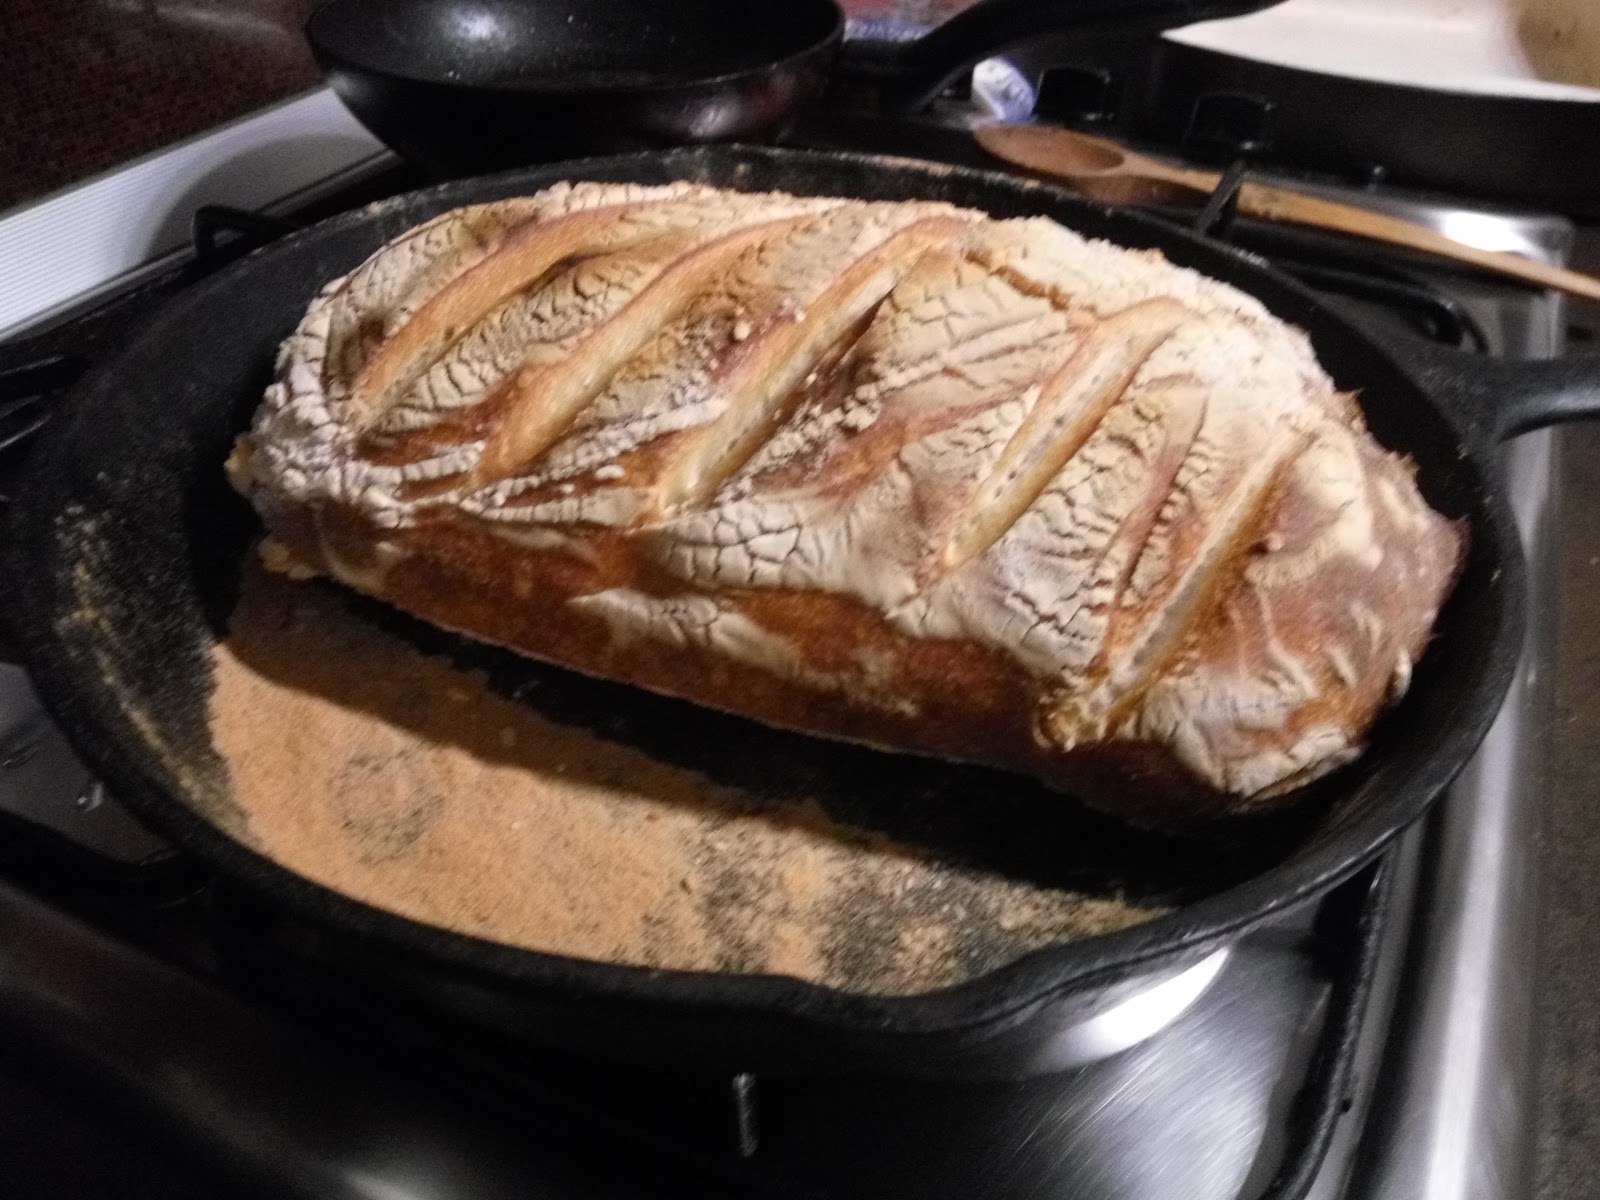
7. Coacerea
Scoateți aluatul din frigider și lăsați-l vreo 30-40 de minute
Porniți cuptorul la 250 C și puneți în cuptor o piatră de copt (sau o tigaie de fontă) și un container cu apă (tavă pe jumătate plină).
După ce s-a încălzit cuptorul întoarceți bannetonul pe piatra de copt sau pe tigaia de fontă și crestați aluatul (cu un cuțit foarte ascuțit sau cu o lamă).
Porniți cuptorul la 250 C și puneți în cuptor o piatră de copt (sau o tigaie de fontă) și un container cu apă (tavă pe jumătate plină).
După ce s-a încălzit cuptorul întoarceți bannetonul pe piatra de copt sau pe tigaia de fontă și crestați aluatul (cu un cuțit foarte ascuțit sau cu o lamă).
- pentru o pâine de forma franzelei, pe lungime
- pentru o pânie rotundă, în cruce
Închideți cuptorul și dați-l la 220 C.
După 15-20 minute scoateți recipientul cu apă.
După ce s-au epuizat cele 40 de minute scoateți pâinea și lăsați-o să se odihnească 2 ore înainte să o tăiați.
După 15-20 minute scoateți recipientul cu apă.
După ce s-au epuizat cele 40 de minute scoateți pâinea și lăsați-o să se odihnească 2 ore înainte să o tăiați.
... și gata
Ăsta este rezulatul ...